To help us assist you better, please tell us what you need assistance with
Questions about Eva/Eva Select Sensors or Evasoft
- Evasoft registration problem
- Sensor not capturing image
- Image missing in software
- Problem opening Evasoft
- Other sensor or Evasoft issue
Other product (pan, cone beam, etc)
Evasoft Registration Problem
To register Evasoft, you will need the software serial number that was provided when you purchased the system. It is a long series of capital letters and would be found either on the CD of the software disk or on the invoice. If you don’t have your CD Serial Number, please email us at custserv@imageworkscorporation.com and tell us:
- Possible names software may have been registered under (Dr name, practice name, etc)
- Office address
- Office phone number
- Newest sensor serial number
Once you have your serial number, follow this process to register your software
Go Back
Sensor not capturing image
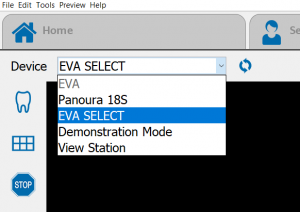
Scenario 1: Check that the correct device is selected. Depending on which version of Evasoft, this will either be shown in the Device menu or in a dropdown in the top left of Evasoft
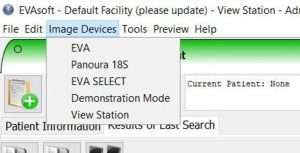
- The Device should say “EVA” if you are using one of the original model of Eva Sensor (you can tell this is your model if the serial number begins with “EVA”)
- The Device should say “EVA SELECT” if you are using the new EVA Select sensor (you can tell this is your model if the serial number begins with “ES”)
If device is not selected, please select the correct device
Scenario 2: If your device is not listed as an option on the list, please reinstall sensor drivers.
- If you have an EVA Select sensor (SN starts with “ES”), make sure sensor is unplugged, then download these drivers
- After the drivers download, right mouse click on the zip file and “Extract All”.
- Right click on RunInstall file and click on Run as Administrator. If you can’t Run as administrator, you may need to talk to your IT to get permission to install
- Follow the directions on the screen. When instructed, plug in the EVA SELECT sensor into the computer’s USB Port. Allow the Windows hardware wizard to run. NOTE: the windows hardware wizard may take a minute or two to complete.
- If you have an EVA sensor (SN starts with “EVA”), please connect to remote support.
- If you have an EVA Select sensor (SN starts with “ES”), make sure sensor is unplugged, then download these drivers
Scenario 3: When initiating a capture sequence, you are getting a green light, but no image and no error message
Double check sensor settings. To do this, go to the Tools menu –> Options, and click on the Eva Select icon on the left side. Make sure:
- Integration time is set to 800 ms
- Trigger level is set to 180 mV

WARNING: changing other settings in this section can affect the performance of your system.
Place sensor in the chair and bring x-ray source so that it is aimed directly down with the edge of the tubehead touching the back surface of the sensor. Take a test shot and see if an image shows up in the software. The image will just show the internal circuitry of the sensor (this is ok).
- If an image consistently shows up with the test shots, this could mean that the image is not getting enough dose when it is in the patient’s mouth. This could be due to a combination of factors:
- The x-ray source is failing or degrading. You may want to have the x-ray source checked.
- The source is not being positioned close enough to the patient’s skin when exposing.
- If an image is not consistently showing in the software when test shots are taken, then check to see if this sensor is having trouble in other rooms as well.
- If the sensor works well in other rooms, this also points to the x-ray in the original room
- If the sensor does not work in all rooms, this points to the sensor having a problem. Please connect to remote support.
- If an image consistently shows up with the test shots, this could mean that the image is not getting enough dose when it is in the patient’s mouth. This could be due to a combination of factors:
Scenario 4: When initiating a capture sequence, there is no green light, or there is an error message
- If this only occurs on one PC, but the sensor works properly on other PCs
- Unplug sensor from the USB drive, and plug it back in.
- Try other USB ports to see if the particular USB port has failed
- Try a different docking station or cable from the sensor to the PC
- Bypass any USB hubs to confirm the hub does not have a problem
- Sometimes, a powered hub may also fix the problem because the power from the USB is not strong enough
- Sometimes, if there is a wireless USB key controlling a wireless device (like a mouse or keyboard) right next to the sensor port, this can also sometimes create interference. You may move the sensor to a USB port on another part of the PC
- Reinstall drivers
- If you have an EVA Select sensor (SN starts with “ES”), make sure sensor is unplugged, then download these drivers
- After the drivers download, right mouse click on the zip file and “Extract All”.Right click on RunInstall file and click on Run as Administrator. If you can’t Run as administrator, you may need to talk to your IT to get permission to install
- Follow the directions on the screen. When instructed, plug in the EVA SELECT sensor into the computer’s USB Port. Allow the Windows hardware wizard to run. NOTE: the windows hardware wizard may take a minute or two to complete.
- If you have an EVA sensor (SN starts with “EVA”), please connect to remote support.
- If you have an EVA Select sensor (SN starts with “ES”), make sure sensor is unplugged, then download these drivers
- If the sensor has problems on all PCs, this points to the sensor malfunctioning. Please connect to remote support.
- If this only occurs on one PC, but the sensor works properly on other PCs
Scenario 5: If the sensor triggers before the x-ray is fired, and the image looks like a static white cloud,
- Double check sensor settings in the Tools menu –> Options, and click on the Eva Select icon on the left side. Make sure:
- Integration time is set to 800 ms
- Trigger level is set to 180 mV
- Double check sensor settings in the Tools menu –> Options, and click on the Eva Select icon on the left side. Make sure:
WARNING: changing other settings in this section can affect the performance of your system.
- If still autotriggering, reinstall drivers
- If you have an EVA Select sensor (SN starts with “ES”), make sure sensor is unplugged, then download these drivers
- After the drivers download, right mouse click on the zip file and “Extract All”.Right click on RunInstall file and click on Run as Administrator. If you can’t Run as administrator, you may need to talk to your IT to get permission to install
- Follow the directions on the screen. When instructed, plug in the EVA SELECT sensor into the computer’s USB Port. Allow the Windows hardware wizard to run. NOTE: the windows hardware wizard may take a minute or two to complete.
- If you have an EVA sensor (SN starts with “EVA”), please connect to remote support.
- If you have an EVA Select sensor (SN starts with “ES”), make sure sensor is unplugged, then download these drivers
- If the sensor still has problems, please connect to remote support.
Go Back
Missing Images
White X’s presented where image should be. This will look like a black square with a white x in place of the image:

This is caused when the network is preventing images from being shared. The first step is to determine which PC is blocking, as it could be the PC you are looking at, the host PC, or the PC which the images were acquired on.
- Go to the host PC, and attempt to view the images that were not showing on the first PC.
- If they present normally on the host, go to a few other PC’s and select these same images
- If images can be viewed on other PCs, then this points to the first PC as blocking the images from the host. On the original PC that was not showing the images, add an exception to the Windows Firewall (process below)
- If image cannot be viewed on other PCs, this points to the host as blocking the images. On the host PC, add an exception to the Windows Firewall (process below)
- If images cannot be viewed on the host, then this points to the PC on which the images were originally acquired. On this PC add an exception to the Windows Firewall (process below)
- If they present normally on the host, go to a few other PC’s and select these same images
How to add an exception to the Windows firewall
This can many times remove a block to images being shared. This process below is for Windows 10
Open windows Firewall control panel and select “Allow an app or feature through Windows Defender Firewall”

Click “Change Settings ” button. If you do not have permission to change these settings, consult your IT.

Click to “Allow another app…”.
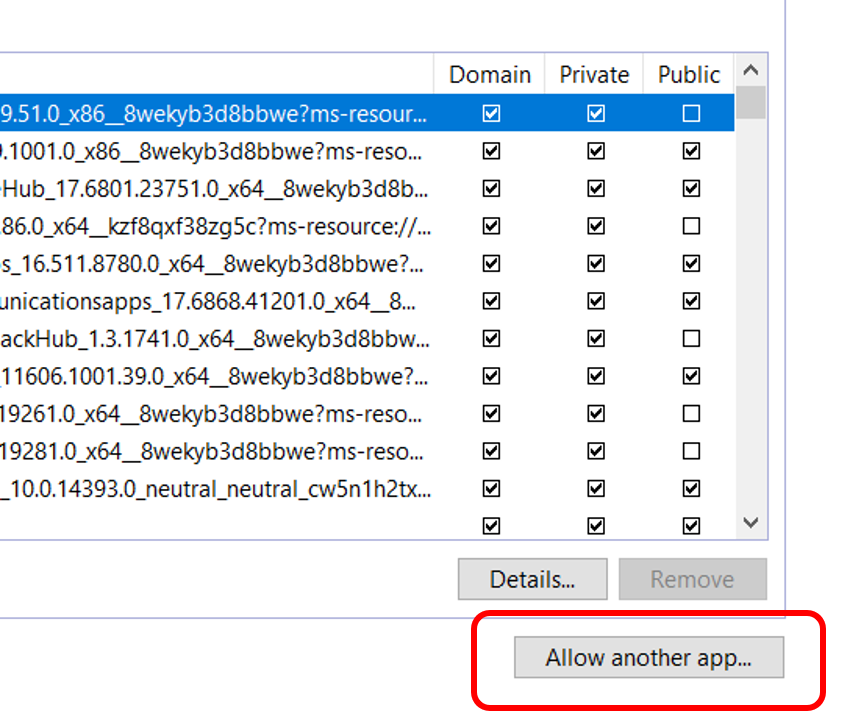
To add an application, click the Browse button

In the windows directory, go to C:\Evasoft folder, and cick on the Evasoft.exe application. Click Open.
You should see the application appear is the list. Now click Network types.

Make sure that “Private” and “Public” options are checked. Click OK.

click Add

Now, click to add another app
Follow the same process as above. However, after clicking to Browse, select the folder C:\Evasoft\jre\bin and select the Java.exe file.
You will see this appear.

As above, click on Network Types, and follow the same process as above to make sure both “Public” and “Private” are checked. Click OK and click Add.
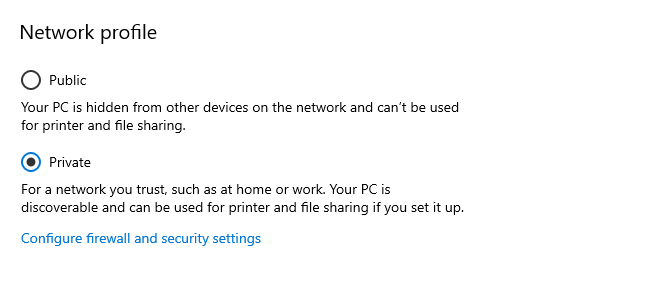
In addition, on this PC go to the “Network Status” settings screen:

Select Change connection properties
Make sure network profile is set to Private
Close Evasoft and reopen Evasoft. Select those images to see if they are now visible. If they are not, please connect to remote support.
Go Back
Trouble opening Evasoft with this error
This error is because the PC can’t connect to host database

- Scenario 1: If only this PC is showing error (i.e. other PCs in the office are able to open Evasoft)…
- Try to cancel and reopen
- If this does not work, this typically means that this PC is looking for the database in the wrong location
- Check the network connection of this PC
- Check that this PC is pointing to the correct location of the host. To do this…
- Go to another PC that is working
- Look in Tools –> Options –> Database and write down the name of that host (in the space “Name of computer with Database on it”)
- Go to another PC that is working

- Return to the PC showing the error above and Click “No” in the “Error connecting to host” message
- In the Database Connection Parameters Screen that pops up, enter in the name of the host taken from the other PCs

- click OK
- If this doesn’t work, please connect to remote support.
- Scenario 2: If all client PCs are showing the same error, this typically means there is a problem between the host PC or server and the client PCs. Go to the host PC:
- Check that Host PC is on and Evasoft is open on this workstation. If it is off, or if Evasoft is closed, starting the PC and opening Evasoft should fix the problem.
- Check the name of host PC. To do this, right-mouse-click on the Windows Start menu and select System. Check the device name for the PC. This is the name of the host PC.
- Check that this name matches the name that each PC thinks is the host. On each PC, go to Tools –> Options–>Database and look at the name of the PC (in the space: “Name of computer with Database on it”)
- If this does not address, check to see if windows is blocking communication on the host PC. On the host PC, add an exception to the Windows Firewall (How do I do this?)
- If this does not work, please connect to remote support.
Evasoft won’t open with no error, or this error

This may be because an Instance of Evasoft is already running and another instance is opened.
Reboot the PC
If this does not work, please connect to remote support.